Included items
- Syringe of Liquid Culture (LC)
- Bag of Sterilized Grain with Injection Port
- Bag of Hardwood Fuel Pellets
- Zip Tie
- Empty Filter-Patch Bag
Day 1
Choose your workspace
When you are ready to start the growing process, go into a relatively clean room to do the steps. Make sure to wipe down surfaces with disinfectant and wash your hands.
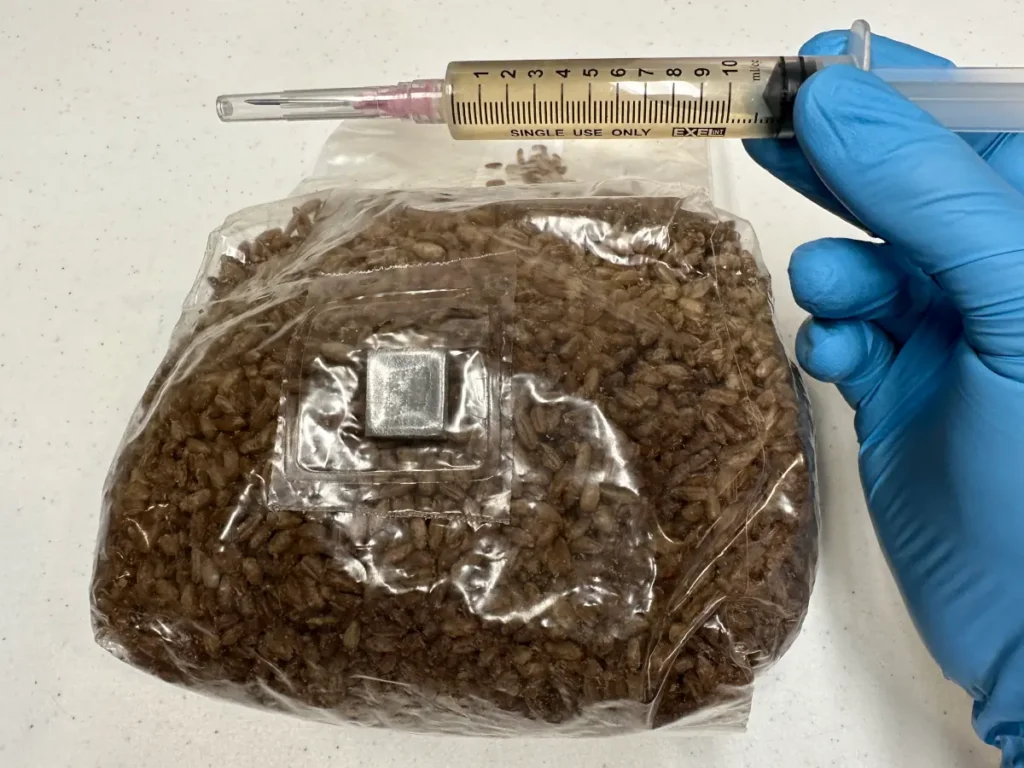
Innoculate the grain bag
Place the LC syringe and the sterilized grain in front of you. Carefully wipe down these items with disinfectant.
Carefully uncap the syringe, unwrap the individually wrapped needle, and screw the needle onto the syringe.
Carefully and deliberately stick it into the gray square “injection port” on the side of the grain bag. Make sure to not puncture the grain bag on the other side.
Depress the syringe plunger down in order to send the LC contents in the grain bag. Try and rotate the bag slightly as the syringe empties, so that the liquid is well distributed around the bag.
Pull out the syringe, and re-cap the needle so that you do not accidentally stick yourself. Properly dispose of the needle and syringe.
Place the grain bag in a relatively warm place, where it will not be disturbed.
Now you must wait!
Day 2-14
Mid-cycle mix the grain bag
Every few days check the bag for signs of the grain turning white, where it came in contact with the liquid. This is Mycelium growing!
Towards the end of the two weeks after inoculation, the white will be quite visible, but most likely it will not cover all of the grain. After about two weeks, grab the bag and use your fingers to break up the clump of grain to distribute the whitened kernels around the entire bag. Mix it for a minute or so.
Day 14-21+
Final colonization of the grain bag
After breaking up the bag, within a day or so, the white kernels should fluff back up vigorously. It will proceed to fairly quickly colonize all of the grain in the bag. By about the 3 week mark, (or a little longer depending on ambient temperatures), the entire grain bag should be bright white colored. Once it is all colonized, move onto the next step.
Day 22
Hydrate and pasteurize hardwood fuel pellets (HWFP)
Watch Here: YouTube
Most gourmet mushrooms grow on a hardwood substrate, so we need to prep our hardwood fuel pellets.
In the empty filter-patch bag provided in your kit, empty out the vacuum sealed HWFP into the bag.
Bring 1.2lbs of water to a boil. VERY CAREFULLY pour the boiling water into the bag, so that it mixes with the HWFP. CAREFULLY mix the two together with your hands. If you have gloves, you might want to use them. It is best to mix as well as you can now, because you want the pellets to be fully hydrated, which helps ensure that they get properly pasteurized. Fold the bag over itself, and set it aside for a few hours or overnight. You want it to cool back down to room temperature.
Day 23
Combine colonized grain and HWFP
Now that your HWFP is hydrated, pasteurized, and cool, it is time to mix the grain into that bag.
Massage the grain bag, in order to once again break up all of kernels. This will allow you to pour the grain.
Fold open the hydrated HWFP bag, and quickly and confidently pour the grain into the filter-patch bag.
Use the zip tie included in the kit, and seal the bag at the top.
Now that it is sealed, give the bag a very thorough mixing and shaking for about a minute or 2. You want the grain to be equally distributed throughout the HWFP hydrated substrate.
Finally, shape the bag into a thick rectangular block. Done!
Place this bag in the same location you stored the grain bag, and give it another two weeks to colonize this final substrate.
Day 24-37
Keep an eye on the substrate bag
Every few days, check up on your bags progress. After a few days, you will see the grain kernels turn white again, and start spreading the mycelium throughout the bag.
After about two weeks, the entire bag should be pretty well colonized, and be almost completely white with some brownish spots.
Day 38
Begin mushroom fruiting
Using a knife, cut an X onto the side of the bag. By allowing a higher concentration of oxygen to reach the surface, it will trigger mushrooms to begin growing. Hopefully we should see some pins forming within a week. You might want to put the bag on the counter and loosely place a plastic bag over it, in order to keep the humidity levels up.
Over time, these little pins will start to grow at an exponential rate as it forms the mushrooms. Once the mushrooms look to be a good size, and the caps are starting to flatten out, it is a good time to pick them!